Freezing Vegetables for Stock

A lot of my recipes call for stock. While I sometimes like to use another type for a particular recipe, my go-to is vegetable. I keep containers of it in our freezer at all times, so we always have some on hand to thaw and use when needed. Why homemade stock? It tastes better and is essentially free! 

Another thing that’s always in our freezer is a bag of vegetable trimmings. I toss any ends or leftover bits of produce in that bag and save them in the freezer. Then, when it’s time to make more –  voila, free stock!

Most vegetable scraps will do, but some of my staple ingredients are:

–onions (yellow, red/purple, white, green)
–leeks
–carrots (colorful parts and leaves)
–celery (leaves and stalks)
–parsley (leaves and stems)
–garlic
–stalks from leafy greens (kale, chard, etc)

Enchilada Pro Tip: Steam your Tortillas!

I used to hate making enchiladas at home because the assembly was such a pain. Whichever method I used to make the tortillas pliable and keep them from breaking would only kind of work – cracked corn tortillas, broken enchilada dreams. Tears have been shed more than once.

As a kid, my mom always dipped the tortillas in enchilada sauce before assembling. This works reasonably well, but is MESSY. You have to either wash your hands constantly or deal with them being covered in a mix of enchilada sauce and filling bits the whole time you’re trying to assemble.

Microwaving or heating in your oven (wrapped in foil) will work. But only so-so. Cracking is not uncommon and it’s hard to keep the tortillas moist.

The best way to prepare your tortillas for enchilada assembly is to steam them. The moist heat makes them perfectly workable. Since discovering this technique, my enchilada woes are a distant (traumatic) memory.

There are a couple simple ways to steam tortillas, with some things you probably already have in your kitchen.

Add 1c water to a small saucepan. Cover with:

  1. Metal splatter screen
  2. Tin foil pierced with a fork

Once water is boiling, place a tortilla on top and steam for 15-20 seconds. Flip and repeat. Voila! It’s ready for filling and rolling. Enchilada perfection!

Why Home Cooking?

Cooking your own food at home can change your life. Though it may seem time consuming and challenging at first, preparing meals from scratch with whole foods and high-quality ingredients will have a positive impact in more ways than you could imagine.


Health & Quality: Greater control over your health through what you eat.

  • Easier to eat healthy or meet fitness goals when you know exactly what you are eating, such as: portioning, monitoring macros, eating enough fruits and vegetables, etc.
  • Feel better from eating foods without any additives or a lot of processing.
  • By hand-selecting your food from whole ingredients, you can ensure that everything is at peak quality and freshness.
  • If you have food sensitivities, you will not have to worry about getting sick.
  • There are a lot of harsh chemicals in commercial cleaners and take-out containers like styrofoam. Preparing meals at home reduces your risk of ingesting these substances.
  • You know that the food has been prepared safely and properly.


Environment: How you choose to eat may be one of the largest ways you impact the Earth.

  • Take-out and packaged food produces a lot of waste (styrofoam, boxes, wrappers, etc.).
  • Less daily travel (or deliveries) for food saves gas.
  • Ability to choose foods that are more ethically or conscientiously produced.
  • Greater opportunity to buy local products.
  • Industrial cleaners, solvents, and production processes are damaging to the environment.


Cost: It is financially beneficial to prepare your food at home.

  • You will save money. For example, if my husband and I ate out just for lunch and dinner, it would cost at least $35/day. Over a week, that’s $245 – without breakfasts, snacks, or coffees. Our usual weekly total grocery bill (all organic, at Whole Foods): $200.
  • Your costs each week are more predictable, making it easier to budget.

Variety & Access: Enjoy a greater range of flavors and cuisines.

  • Can make things you would not otherwise be able to get (if the restaurant is located elsewhere or the type of food you want is not available in your area) or create dishes that do not exist (healthy fast food tacos!).
  • Make favorite foods yourself, just the way you want.


Convenience: Your time and brain power are precious.

  • Eat when you want or need to, without having to go out or wait for a food delivery.
  • You do not always have to figure out what to eat before every meal.
  • Plan ahead. You have the ability to freeze fresh foods and save at peak freshness.


Knowledge: Learning about your food and how to prepare it will pay off.

  • As you learn more about your food and its content, it becomes easier to balance your diet every day.
  • Once you learn the basics, you have freedom to create what you want!
  • Everyone has to eat! Instead of going out, invite people over and eat in. This has the added benefit of impressing people, as well as bringing friends and family together.
  • Bridge cultures through food, it is a great way to learn about other people and places.


All that being said, we still like to go out to eat from time to time. When you do eat at restaurants, knowing more about the food allows you to be sure what you are ordering and appreciate it more. You will also understand what goes into creating those delicious foods!

Recommendation: Midnight Moon Cheese

I originally found this cheese at Whole Foods and picked it out because of the name – Midnight Moon. This is one of the best, most balanced cheeses I have encountered. It’s also really visually appealing, ivory in color and wrapped in black wax.

A goldilox goat cheese:

  • Not too soft, not too hard: Cuts easily, slightly flaky but doesn’t shatter
  • Not too sharp, not too sweet: Perfectly salted
  • Not too goaty but with a good flavor: Rich and buttery
  • Smooth and creamy, not sticky: I have not tried melting yet

I really love that it has a little crunch from crystallization, while otherwise being sharp and creamy. This cheese is great with crackers and radishes for a simple appetizer plate. Midnight Moon also pairs very well with a variety of red wines, and I can imagine it would be great with a white as well.

I would recommend this cheese to anybody who eats dairy. If happy goats make yummy cheese, it seems your goats are very happy, Mary Keehn.

Producer: Cypress Grove
Cheesemaker/Proprietor: Mary Keehn
Country: Holland
Milk Type: Goat
Texture: Hard
Aging: 12 months

Beating Beets

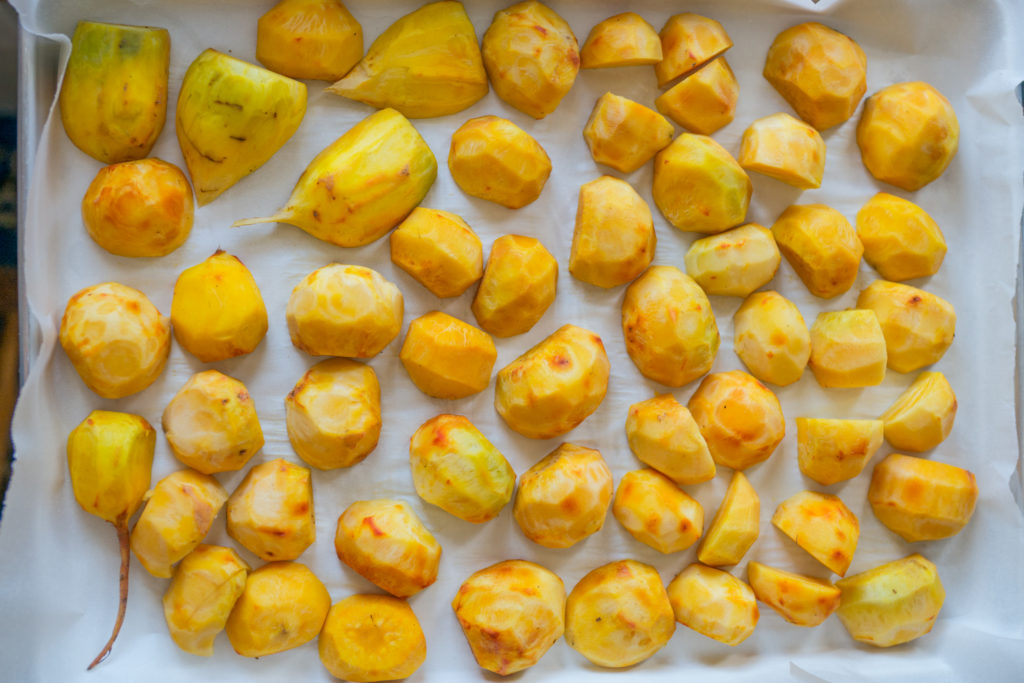
We use frozen golden beets every day in our morning smoothie, which means we go through a lot of them. However, you can’t just buy frozen golden beets. This means I buy a giant produce bag full of raw golden beets every 10 days or so. Getting that big sack of beets from fresh-from-the-ground to frozen-and-ready-for-smoothies is a process I suffered through for months. I would carefully scrub, trim, slice, and roast the beets – and then spend about 30 minutes laboriously removing the peels from each piece by hand. This left my fingertips golden, my nails full of beets, and my patience worn thin.


I researched and attempted different methods. I tried peeling the beets quickly when they were still hot, but it wasn’t much easier. I read an online tutorial about steaming them and rubbing the skins off with paper towels, which seemed wasteful (we also do not have a gigantic steamer). I decided against boiling them, since you can lose a lot of nutrients that way.


Then, one weekend as I was dreading the beet preparation process, I realized there was a much easier way to make this all happen – peel the beets first! It’s so simple, but this is a real game changer, especially if you regularly roast and freeze beets for smoothies.


Wash the beets and trim the ends. Remove the peels with a knife or vegetable peeler. Halve or quarter the beets, depending on size. Place all the beets on a baking sheet lined with parchment paper and add a cup of water to the bottom of the pan. Roast at 400 for 45-60 minutes, or until you can easily insert a fork. Cool and cut in to pieces. Place pieces on a parchment-lined baking sheet in a single layer and freeze overnight. Break pieces apart (if frozen together) and store in a freezer-safe bag or container.
 

New Site

Welcome to my website! My name is Carley Papi. I’ve had a passion for food ever since I “cooked” that first snack with my McDonald’s Happy Meal Magic™ playset. (Thank you, Mom.)  

Since then, through trial and error, I’ve learned my way around the kitchen and now want to share my knowledge. My husband and I have spent the past months documenting recipes, taking photos, and building this site. We created CarleyPapi.com to be an online resource for sharing good food, health advice, and kitchen tips.

Please reach out to me by email or through social platforms with your thoughts, questions or ideas about my food, or any food. Many thanks to all who have given and inspired recipes, let me borrow your dishes for photos, and taste-tested my food.